IoT Home Automation with 3D-Printing (sadly, no blockchains or Big Data)
Date: 10/03/2019 - go back home

I'm very happy to talk over my most time-consuming (and fun) project to date: monitoring and automating things in my flat with the power of IoT. The wheels were set in motion when I got myself a Prusa I3 MK3. The initial 3d-printing-fever gone (and a mountain of 3D printed objects of questionable utility later), I started designing a system to water my plants and feed my fish when I'm away. Fast-forward height months, countless hours of soldering and tinkering have been spent and I'm finally happy with my setup.
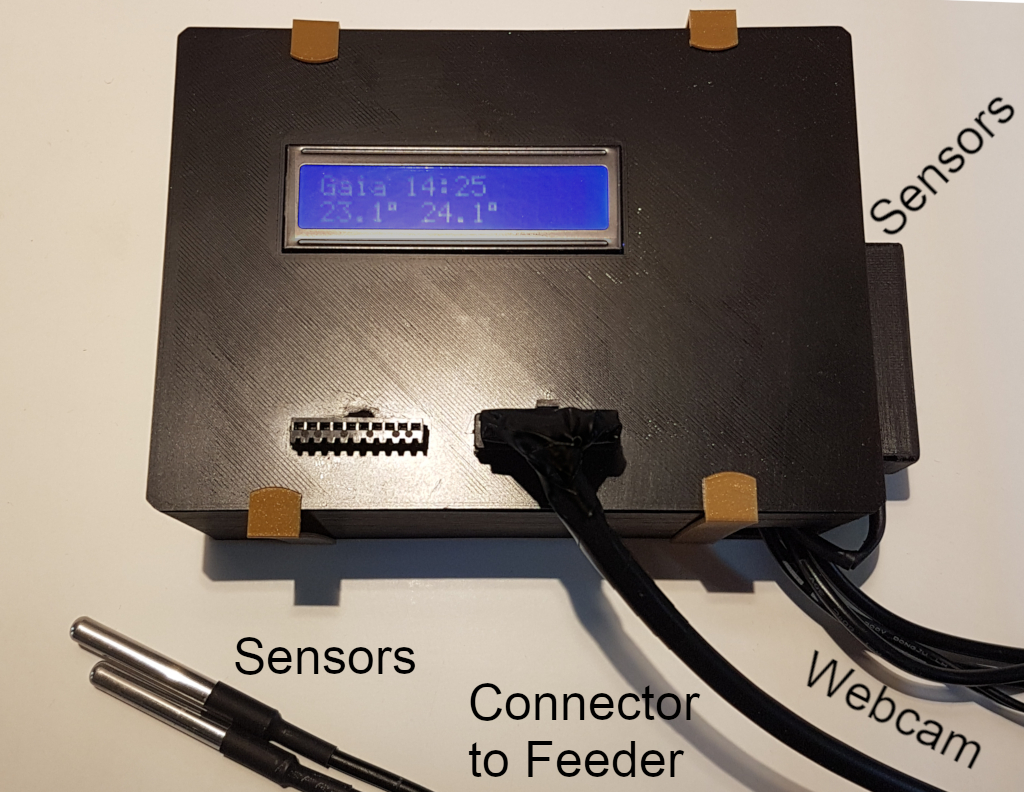
Where I've gotten so far is a Raspberry-Pi with sensors, periodically reporting and getting updates from a server, and controlling a plant-watering module and a fish-feeding module, everything designed from scratch. Naturally, there is a live stream on Twitch, too, so Gasparov can also get his dopamine hits interacting with followers, and I can get a virtual aquarium at work.
This project isn't particularly complex, but its breadth made things harder:
- designing, testing and getting the hardware right was certainly the most time-consuming task, but also...
- the software must survive reboots and configuration errors;
- the raspberry should monitor its internet connectivity and have a reliable remote management interface;
- there should be a server with a GUI to monitor things;
- the interactions between the software client and server must be tested;
- the live stream should have good quality without killing the CPU;
- I need log files to debug potential crashes, but they shouldn't grow too big and fill the disk;
You don't have to read from top to bottom. Jump to the section that interests you most:
- 3D-printing primer: printing and designing 3D models
- Fish Feeding Module: fish food is messy!
- Plant Watering Module: eh, that's just some pumps
- Software aspects: testing & resilience
- Livestreaming: getting decent quality with a Raspberry
3D-printing primer
Most things about 3D printing are surprisingly easy. Assembling the kit for the printer proved to be time-consuming but not difficult, and after several days I've got this bad boy up-and-running:
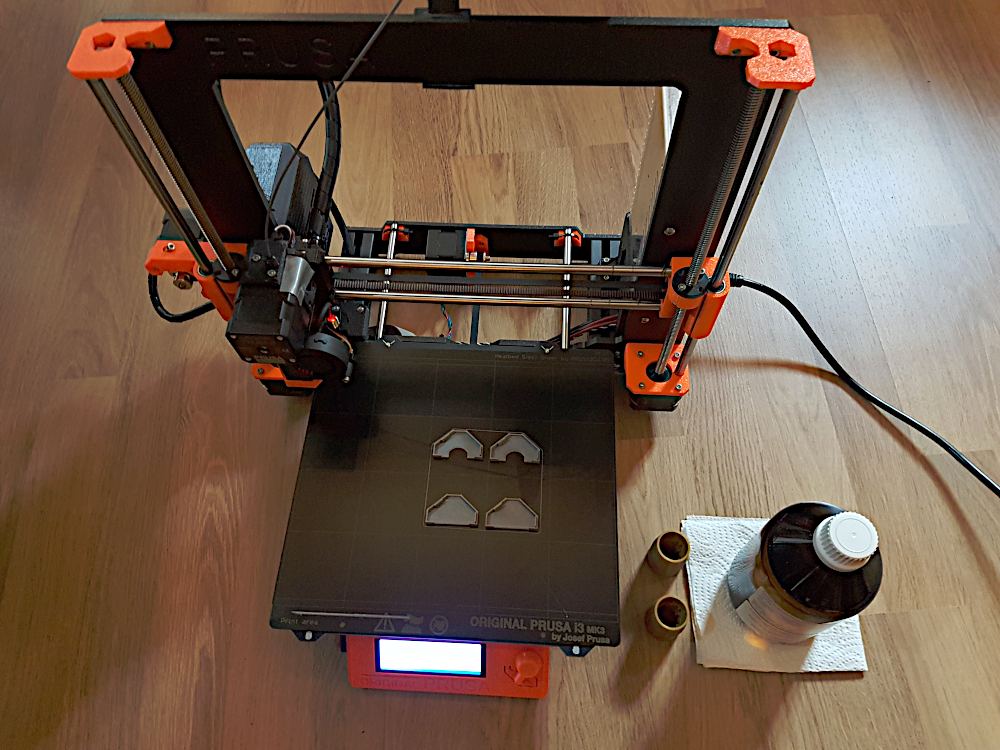
At this stage, printing 3D models (e.g., from Thingiverse) can be done very simply: download the .stl file, fire up slic3r, select your printer and let the program "slice" the .stl to a .gcode file, which is essentially a list of movements for the printer head. Feed the .gcode to the printer and wait a few hours, and voilà! The only important parameters when slicing is the presence of brim, a border around the first layer that help increase adhesion and reduce distortion due to cooling, and the supports (think of it as "pillars" for upper layers).
Designing custom 3D models is certainly more time-consuming, and the learning curve is significant. Luckily, for simple parts it can be summarized as: (1) draw one face in 2D, and (2) extrude to 3D. I used OnShape which is free (for public projects) and quite beginner friendly. You can actually reuse/import my projects there and continue editing them.

Fish feeding module
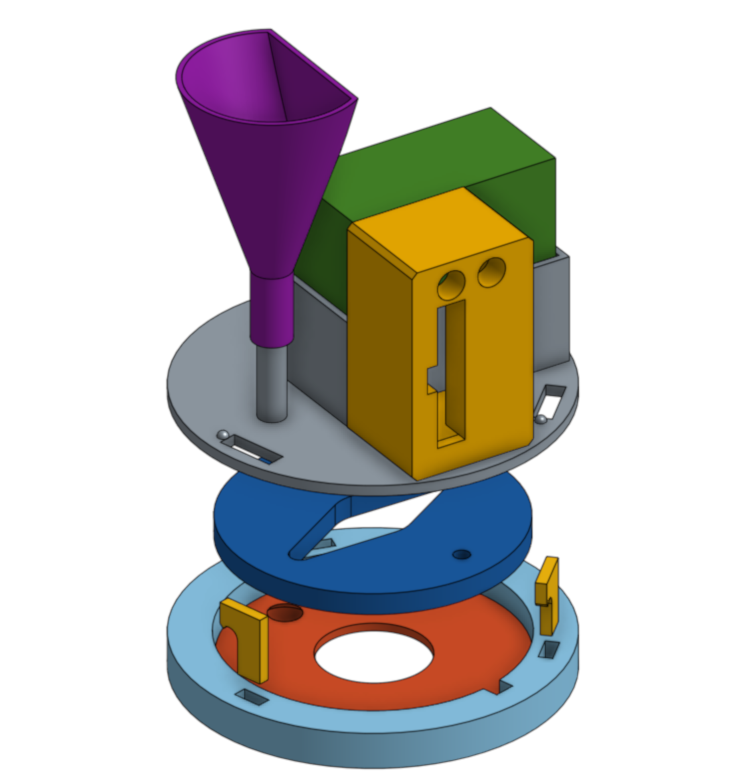
Undoubtedly the most time-consuming part. My original design was inspired from the feeder from hmil. The food goes in the purple funnel; to feed the fish, the blue disk rotates until a hole is aligned under the funnel, then rotates back, releasing the contents into the tank. This design wasn't too bad, except that food delivery was really inconstant: food would get stuck in the funnel, in the distribution disk, and while it was better than nothing, it certainly didn't bring me any peace of mind.
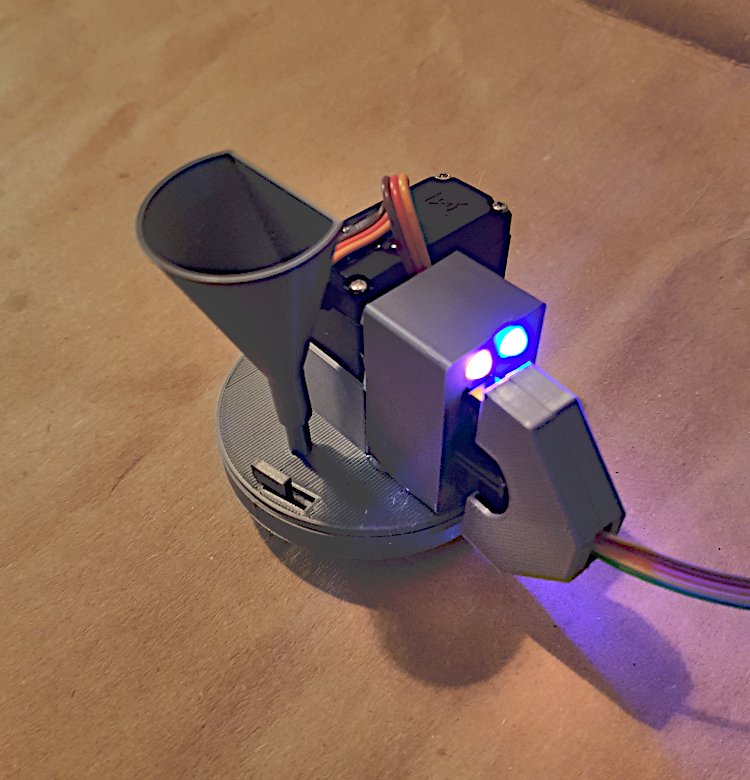
On a side note, we see here small features that comes really handy in practice: removable wires with plugs, which really helps for storing away the feeder, and two status LEDs: one indicating that the power supply is fine, the other, blinking, indicating that the feeder is controlled by the software.
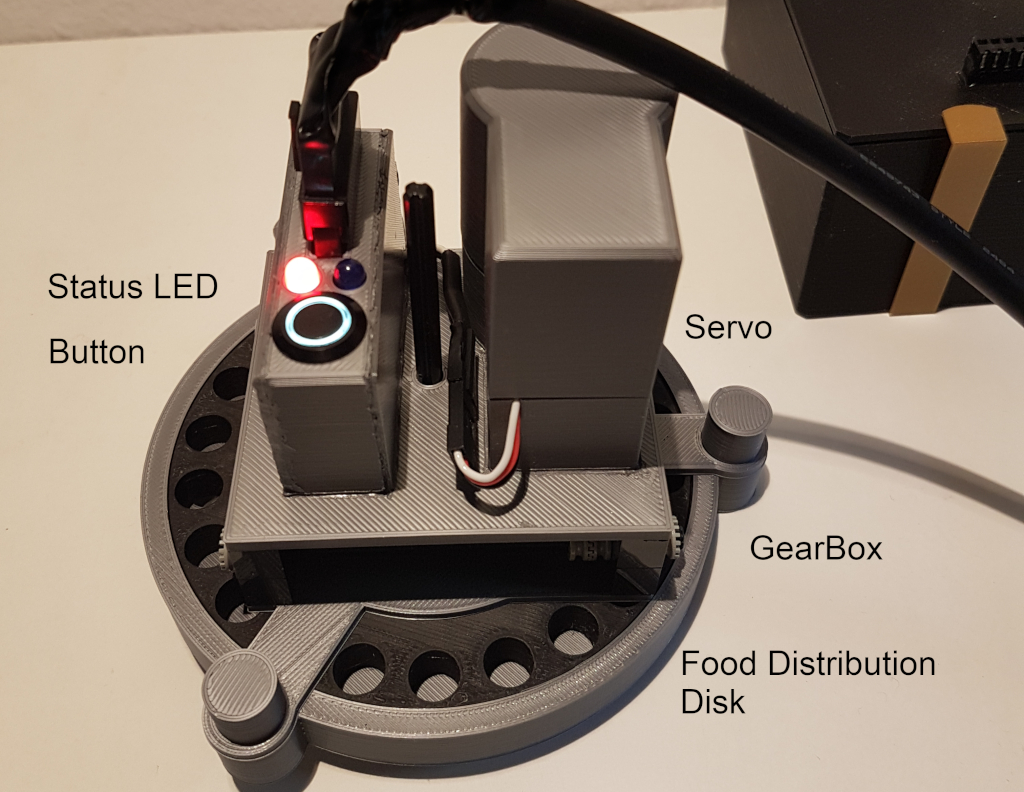
My second design is a bit more complex, but works much better for food delivery. It consists of a distribution disk with holes, one for each day, which are manually preloaded with food before I leave for holidays.
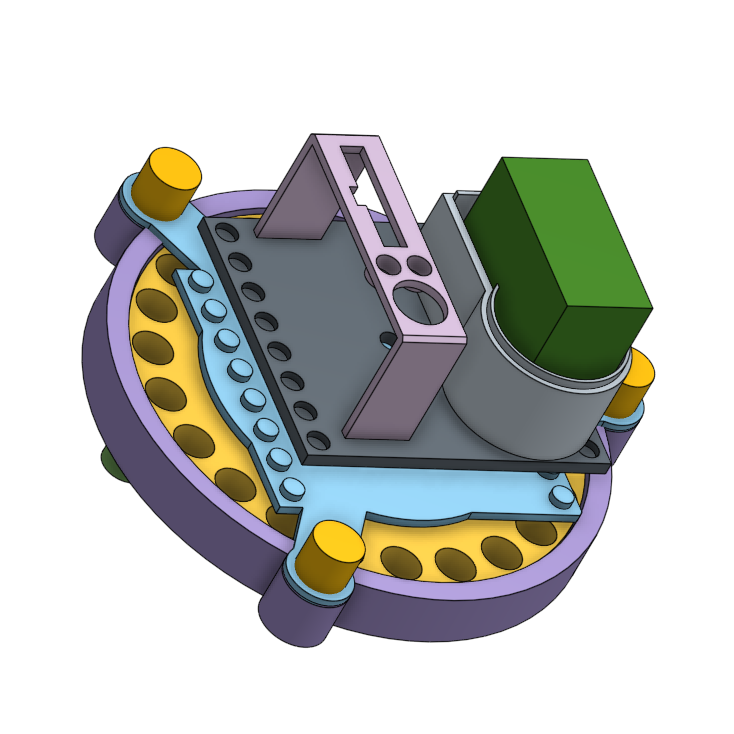


Standard servo where too imprecise for this design (and had too little torque when rotating slowly). Additionally, it required keeping additional state (the current angle); I couldn't simply tell the servo "do +1.5 degree". Hence, the new design uses a continuous servo, with a set of gears that divide the speed. Feeding corresponds to exactly 14 seconds of rotation; imprecision are not dramatic as the holes are large, the disk rotates slowly, and in the worst case it just shifts the food for one day to the next day.
We note that I used Lego parts for the gears; not only gears are surprisingly hard to design and print, hence the value of re-using existing gears, but it is also fairly easy to print parts compatible with the Lego set.
On the last picture, you see 3d-printed screws: yes, they work fine :) this part was a tad more complex to design, but here's a (somewhat obscure) tutorial.
Finally, the button is there to align the disk to the zero position, another thing that would have been painful to get right with a standard servo and different disks. This way, I can fill and close the feeder in the non-zero position, then hold the button to zero it without keeping any state.
Plant watering module

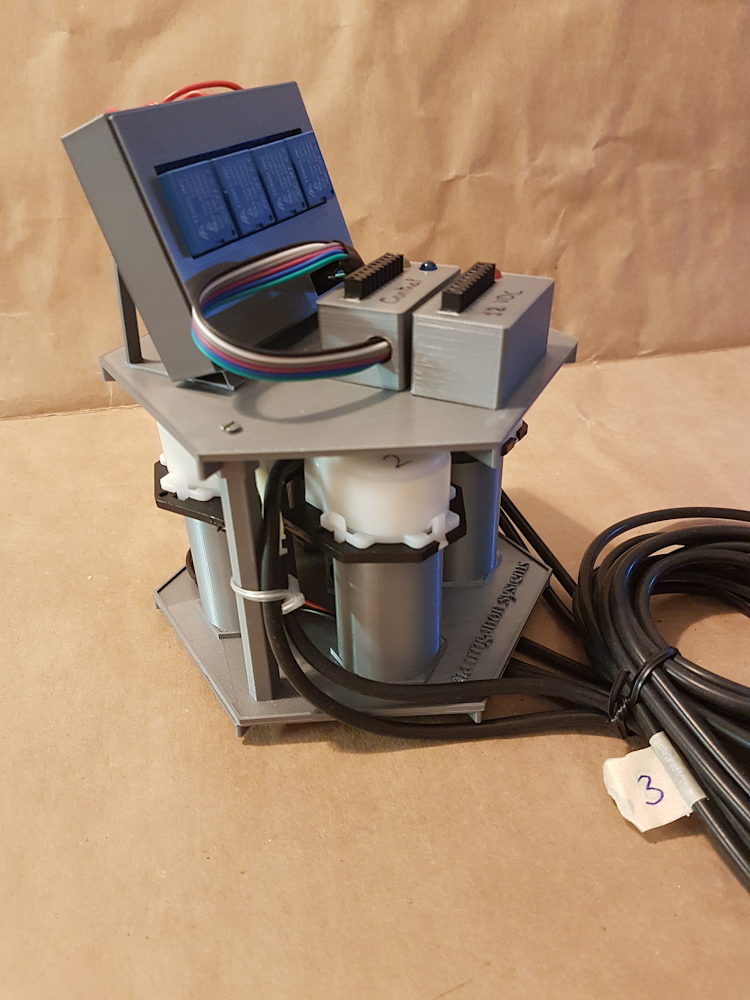
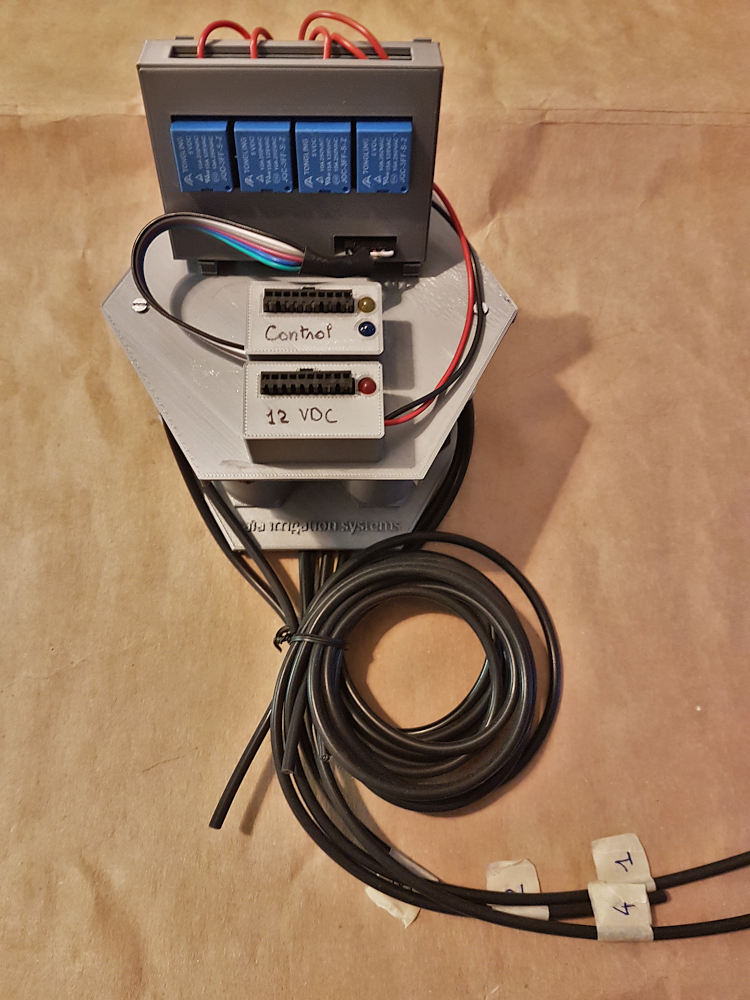
This module consists of a 4-channel relay board and 4 peristaltic pumps. Peristaltic pumps are perfect for the job, as they don't need to be immersed in water, and they pump air and water alike (thus, they don't need to be primed). I tried to come up with an initial design consisting of one pump and a "water splitter", but in particular since different plants need different quantities of water, I ended up with four pumps. Another reason is that I didn't find a 2mm water splitter; printing on in 3D is perhaps possible and is still on my TODO-list.
Since the pumps work in 12V/80mA, their circuit is completely separated from the Raspberry and have their own power supply. The relays work with 5V, and hence can be directly connected to the Raspberry's GPIOs.
Similarly to the feeding module, we have status LEDs indicating (1) that the 12V power supply is on, that (2) the 5V is connected to the Raspberry, and (3) that the software is controlling this module (blinking LED). Hence, a third party can come and immediately check that everything's fine (and typically just checks the water level in the jar).
Software
Server
The first version of the server was written in PHP; adding features was really painful (especially the interface with the database and the client in Python). I thought it would be a good occasion to test Protobuf and gRPC, and the new version is written in Python too. On the topic of gRPC, I wanted to compare it to an end-to-end typed architecture (e.g., with Node on the back- and front- end) for additional rigorousness. Things are great with gRPC, in particular it's very pleasant to define the typed messages and the API endpoints at single place. Unfortunately, I'm still not freed from input validation and manual date conversions (for instance when parsing the web form to update the config). All things considered, I'm relatively happy with this software stack now, despite the initial pain of defining pyenvs and imports in python modules.
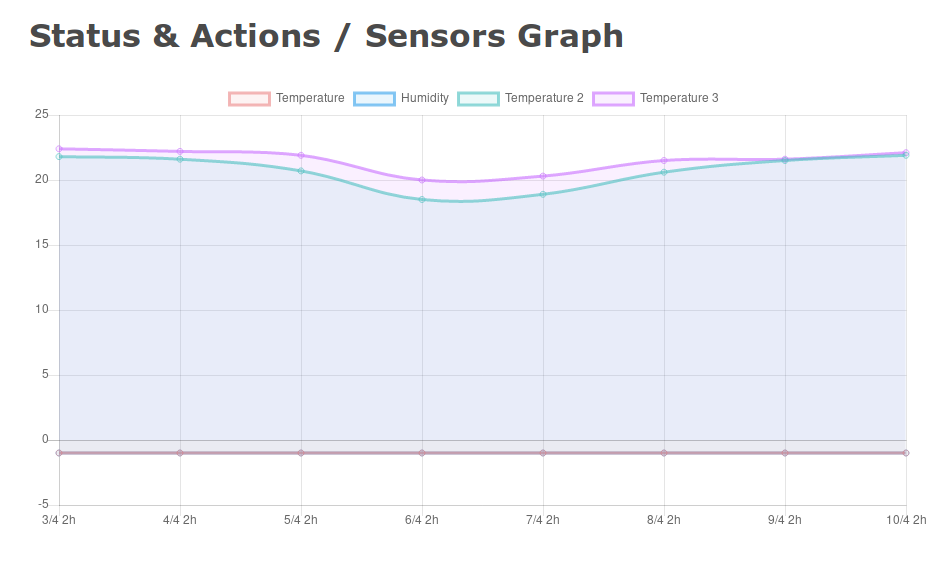
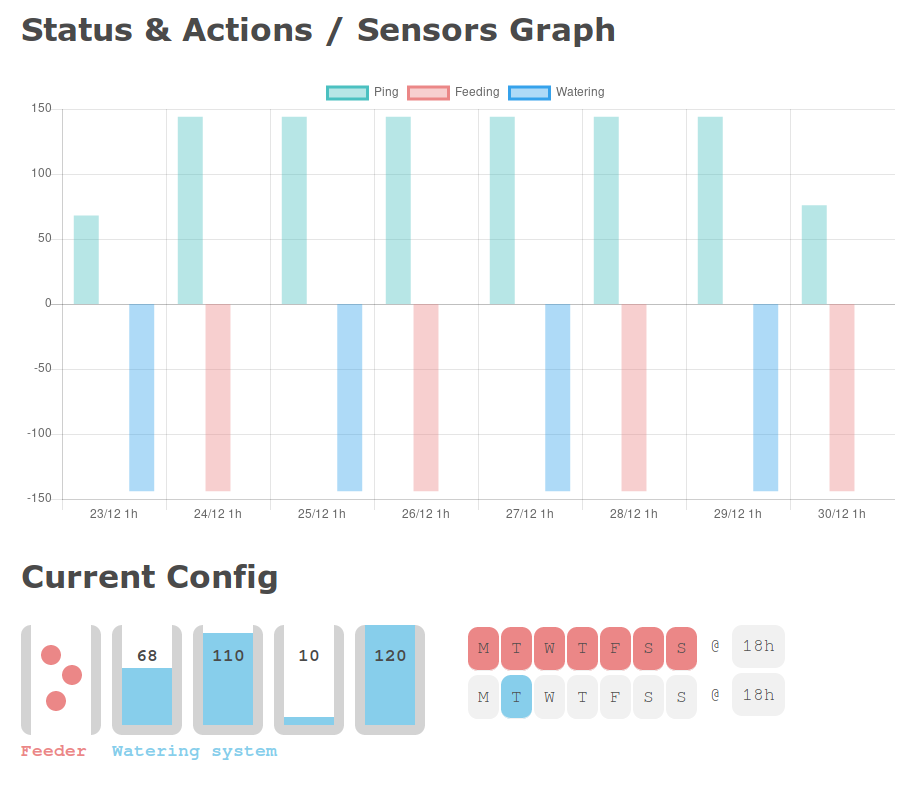
The server is fairly simple; it displays information from the clients: sensors data, memory, disk usage & uptime, as well as all "reports" (heartbeats).
The client can be updated through the server interface. If something goes wrong (e.g., a wrong input from my side), the clients defaults to the hard-coded config. It can also be rebooted or shutdown from the Web UI (in case something fails with the SSH reverse tunnel).
Client
The client (running on the Raspberry) is programmed in Python. It is built to be as resilient and independent as possible. It doesn't need internet connectivity to function, only to report the status updates to the server. It is almost reboot- and power-failure-resistant in the sense that almost everything is stateless, and most of the time it can be rebooted with no negative effect on the system.
Since everything is in Python, this version has extensive integration tests (with Travis). Well, tests are done against a mock server, but it reduced the number of bugs drastically, especially when sending and parsing messages to the server. Of course, there is a part of the software that uses the GPIOs to control the hardware, which cannot be tested on Travis: for this, I have a manual exhaustive test which sequentially runs checks on the hardware. Despite the number of moving parts, I found this solution to work well.
There is a reverse-tunneling done to allow remote SSH access. After fighting an uphill battle with cron scripts to monitor the ssh server, I switched to autossh, which does a wonderful job at keeping a reverse-tunnel open at all times.
I keep my various scripts and checks running with crons. They should be straightforward, yet every time, I'm still surprised to see that something failed. To summarize quickly the important points, crons in /etc/cron.d/ do get loaded automatically after a write, but they don't have the same syntax as the lines in crontab -e (you need to add the user before the command, like so). Additionally, you can't have a nohup in a script executed by cron, or it will be silently discarded.
I manage my logfiles with Apache's rotatelogs which is simpler to manage than logrotate; it's not a service, just a command to which you pipe your logs. For instance, the command is myscript | rotatelogs -n 5 out.log 1M to keep at most five 1MB-files named out.log, out.log.1, etc.
Live Streaming: Getting decent quality
My first attempt has been with motion, which I do not recommend. Motion seems to be focused toward motion detection (surprise surprise), and has a handy built-in webserver which can also be used for livestreaming. My initial setup was to open a reverse-tunnel to my VPS (I certainly didn't want to open a hole in my home network) to the motion webserver. The first major drawback is that the encoding into MPEG was done on the CPU, using 100% of the first core. Granted, the Raspberry pi 3 is quad-core, but still. But more importantly, MPEG is not meant to deliver smooth streams: each frame is encoded individually, and the slightest jitter on the network is visible on the image. I'd say this setup was functional, but with the bare minimum quality, and it was certainly not pleasing to watch.
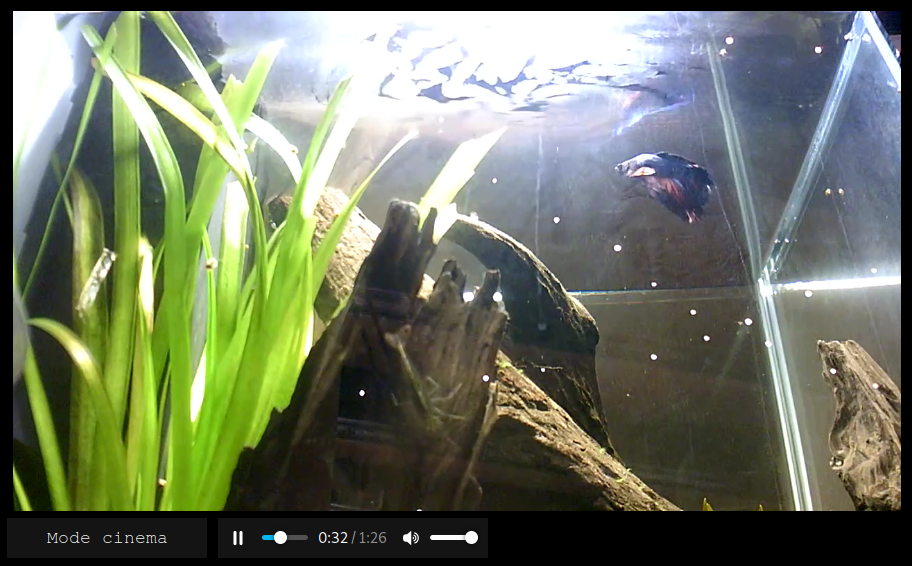
Despite my preference for systems that I fully control and own, I started exploring live-streaming to YouTube. The principal appeal is that buffering the video and performing load balancing when serving multiple users is done well and "for free". Long story short, it didn't work at all on YouTube, but it did on Twitch. The stream is started with a single Linux command, and has a very decent quality. On the downside, the stream has a 30-second delay, which is perfectly fine in my scenario.
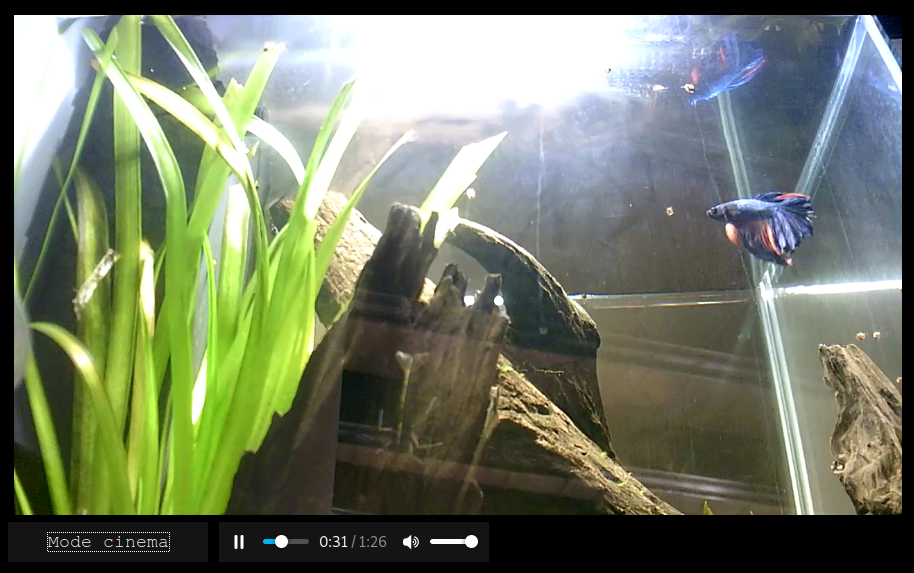
The final trick was to recompile ffmpeg for Raspberry; the process is not complex, and it allowed ffmpeg to use hardware-decoding for the camera; now, I'm streaming at 720p, and only 20% of the first core is used.
I keep the stream running with a cron; a neat trick is to use Twitch's API to make sure the stream is running, and restart it otherwise. It's done with a one-liner involving curl and jq to parse the json.
Note: I'm using a USB webcam, and I've heard that with the native Raspberry camera, the decoding is done automatically on the GPU (without recompiling ffmpeg). Perhaps the performance with motion is good in that case. Still, the encoding used will never compensate lags in the network the way Twitch does.